Table of Contents
Document templates
Document templates are templates that can be used to create multiple documents with the same structure.
The common content between documents can be written into the body of the template, while the content that varies with each document can be added to the template as variables.
There are two ways of feeding values to the variables of a template:
- By sharing a form with the desired recipients. The form is based on the template and contains a field for each variable; and
- By creating a document through the Documents section and selecting From template as the method, which will open a pop-up window with fields to enter the values for the variables.
Creating a document template
There are two ways to create a document template:
- The main way - by using the +Add Template button in the Document templates section and uploading it;
- By using the “Save as new” function while editing an existing template. This option is contained in the arrow pointing down next to the “Save” button at the Edit Document Template screen.
Creating a template by uploading a file
To create a document template by uploading it, access the Document templates option in the left menu. A list of the document templates in your DocQ environment will be displayed. Click the +Add Template button.
In the Template settings section, choose a name and a workflow. Documents created with this template will follow that workflow by default.
The Content access drop-down list allows you to restrict the access to this template to the selected content access permission group.
Upload the template file to DocQ by clicking on Upload file or by dragging and dropping it in the upload area. DocQ currently supports the .docx and .pdf filetypes for document templates.
Next, click on the Create button on the bottom-right. A preview will be displayed.
If you uploaded a .docx file, you can use the document editor embedded in DocQ to edit the template by clicking on Edit at the top of the preview.
At this stage, you can already use your new template to create new documents by accessing the Documents option in the left menu, clicking on +Add Document, selecting From template and choosing your new template from the drop-down list.
Saving as new
To create a copy of the document template, click on the Save as new dropdown, next to the Save button.
This will create an identical copy of the template, including the form customization.
Creating a template using a document
To create a template using a document, access the Documents option in the left menu. A list of the documents in your DocQ environment will be displayed. Find the desired document and click on it to edit it.
A preview of the document will be displayed. Under the document details window, find the Revisions section. Select the document revision version, by clicking on the ellipsis's and clicking the Create template from current file version button. To preview a revision click on the file icon to the left before selecting a version.
A pop-up window will be displayed. Choose a name and a workflow. Documents created with this template will automatically follow that workflow. Select the content access permission group that will have access to the template and click on Create.
Adding and editing variables
Adding variables to a document template allows you to easily create multiple documents that have a common structure but different values for certain content, such as a name, an email address or the answer to a question.
As explained in the beginning of this article, values are fed to the variables by users. This can be done by sharing a form based on the template or by creating a document using a template through the Documents section.
To add variables to a document template, access the Document templates option in the left menu, find the template in the list and click the pencil button to edit it. A list of the variables in your template will be displayed in the Variables section, to the right.
Adding variables to a PDF template
For .pdf templates, you will see the +Add variable button below the list of variables. First name your variable, then open the dropdown and scroll down to the Positions section. Click on the position button #1 and click on the document to place the variable display location. You can add more display copies of the variable by clicking Add position

Some variables may receive a large sentence as a value. It is possible to delimit the area of the document that will be used by it through the resize tool, at the bottom-right of the variable field. Click and drag to define the desired area.
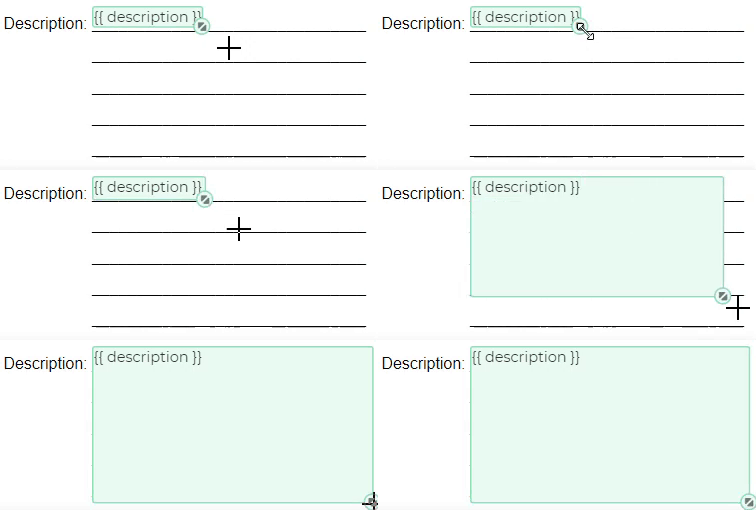
Each variable must have a unique name. Use the Variable name field to enter it. Note that the first character cannot be a number, and no symbols other than _ (underscore) can be used.
To adjust the font size of the variable to better match the text of your documents or to be able to fit more content, click on the 100% button in the positions list of a variable and adjust using the slider.
After adding, editing or removing variables, click on the Save button to save template and variable changes.
Adding variables to a DOCX template
For .docx templates, variables are added by editing the content of the template. This can be done through the document editor embedded in DocQ by clicking the Edit button at the top of the preview, or by downloading the template, editing it using an editor of your choice and then uploading the updated version back to DocQ using the Upload file option in the Template settings section.
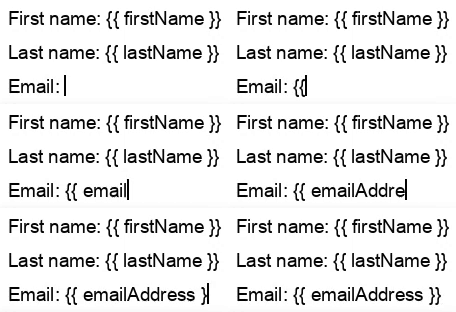
To add a variable, choose a name for it and type it between braces in the desired position in the document.
To insert this same variable in more than one position, simply re-type its name between braces in the desired positions.
Note that it is not possible to use the same name for more than one variable, the first character cannot be a number, and no symbols other than _ (underscore) can be used in the name.
When using the embedded text editor, changes can be saved by the save button in the editor. To update the changes, click on View to leave the edit mode. The document template and the list of variables will take a few seconds to be updated.
Editing the settings of variables
Editing a variable allows you to define its type, such as text, number, among others, and its properties in forms, such as a label, a hint or if it will be a required field or not.
Note that certain variables may be in use by a workflow. If this is the case, make sure to update the workflow, if necessary, to avoid errors with the documents that will move through it.
There are three ways for the steps of a workflow to use the variables of a document template:
- Step types that allow you to specify an external user, by using variables to define who that person is (name and email address);
- Step types that allow you to compose an email, by inserting the variables into the subject or the body;
- Steps with IFTTT conditions, which test the values associated to the selected variables to define the next step for the document.
To edit a variable, check the list of variables, where you will see a blue arrow for each item. This is used to edit the specific settings of the variables. When clicking on it, the Variable properties will be displayed.
Some of the settings are present for all types of variables:
- Variable Name: Each variable will have a name which identifies the variable when used in other areas of DocQ (e.g. email templates, IFTTT conditions). By convention, camel casing is used for these names (e.g. myVariableName).
- Label field: to define the text that will be shown next to the variable when creating a document or when using a form based on this document template. When left empty, the Variable name will be displayed in its place;
- Hide value dropdown: Gives the option to display, hide or hash variables in the document. Hashing a value will replace the real value with a secret value. Hiding a value will make it invisible altogether in the document. The purpose of this feature is to avoid displaying that information to every user that will have access to the document.
- Hint field: will display a hint under the form field. Leave it empty to disable it;
- Read only tick: When enabled, creates a non-editable form field. Useful for prepopulated values from an integration with DocQ.
- Required tickbox: can be toggled to make it a required form field;
- Positions: defines the location on a pdf document that are variable will be displayed. Multiple positions can be used to duplicate values - for example putting a client name at multiple points in a paragraph.
- Initial Value: defines a starting value for the form which will be used unless the user changes it. Overwrites, the hint in the field for string fields.
Select the desired variable type from the Type drop-down list. Each type may have specific settings.
Variable Types
| Types | Description | Form field example |
|---|---|---|
| Text | For texts composed of few words, like names. For longer texts, use the Textarea type. 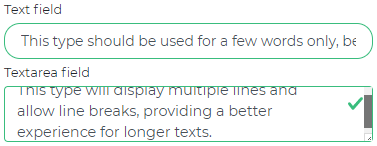 |  |
| The proper field type to request email addresses. Toggling the Demand email confirmation from user switch will insert an extra field for the user to re-type it. | 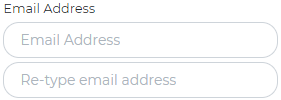 |
|
| Number | The proper field type to request a number. |  |
| Date | To select a date from a calendar. |  |
| Date and Time | To select a date and time, like a timestamp. |  |
| Boolean | A checkbox for users to answer 'Yes' or 'No' / 'True' or 'False' inquiries. Check the Default value option to leave this item checked by default in the form. |  |
| Textarea | For longer texts, composed by sentences or descriptions. Unlike the Text type, this type will display multiple lines in the form field and allow line breaks. |  |
| Dropdown | For users to select an option from a drop-down list. The Label field defines the text that will be displayed for that item in the list. The Value field defines the value that will be associated to the variable if the item is selected, and will be displayed in case the Label is left empty. Click on the Switch to import mode button to be able to paste multiple options at once instead of adding them one by one. Paste the options in the text area, one option per line. For the Separator, choose the character(s) that will be used to separate the Label from the Value. Then select the Order in which your options is arranged. Finally, click on the Convert to list button to convert the content to a drop-down list. |  |
| Checkbox | Inserts multiple checkboxes for users to check the desired ones. The Label fields define the text that will be displayed for each item in the form. The Value field corresponds to the name of each checkbox, and will be displayed in case the Label is left empty. To add a new checkbox item, click on +Add option. This variable type is currently available for .pdf templates only. |  |
| Currency | For user to select a currency, monetary value from a dropdown list of currency symbols, allowing to input the numeric value with the corresponding monetary symbol. |  |
| Signature | For the user to create a variable, determining its subtype as either signature, initials or date stamp and selecting the signature area by clicking in the document and adjusting it at will. |  |
| Clause | A variable type which allows its value to be switched for existing clauses in the Clause Library. To add a new clause to the library, navigate to it via the main menu on the left, clicking on Templates, then Clauses and finally the button + Add clause. To specify which clause will replace the variable's value in the template, use the Edit Document Content Step in the workflow. |  |
| Custom text | Allows the user to format the text entered in the form field with basic tools, such as lists, headers and more. Unlike the Text type, this type will display multiple lines in the form field and allow line breaks. | 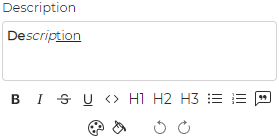 |
Using regular expressions for content formatting
In DocQ, you can use regular expressions (Regex) for template variables. By defining a regular expression, the user filling in a form will be requested to enter the value following a specific pattern.
To set up a regular expression for a variable, you must define the pattern under Regular expression validation. The drop-down list brings a few pre-defined options, such as the pattern for SSN (USA) or a phone number (USA), and also the option to manually enter a pattern. Select an option for the pattern field to be displayed. Note that, when selecting a pre-defined pattern, it is possible to edit it to make the desired adjustments.
For more information on the syntax used for patterns, visit this website.
A basic example is the pattern to enter the number of a credit card:
(([0-9]){4}\s?){4}
- [0-9] is used to require any digit in the range from 0 to 9 for the value to match the pattern;
- {4} is used to require the previous element four times in a row. This way, [0-9]{4} requires four digits, from 0-9, in a row, for the value to match the pattern;
- \s is used to require a space;
- ? is used to require the previous element zero or one times. This way, \s? requires zero or one spaces;
- The use of parenthesis can be compared to their usage in algebra. Here, they are used to group the elements of the pattern, allowing operations to apply to all elements between parenthesis.
Therefore, the pattern for a credit card number will require four groups, separated or not by a space, of four digits (from 0 to 9).
In the Error message field, enter the error message that will be displayed if the value entered in the form field does not match the defined pattern.
Saving the changes to the variables
After editing the variables, click on the Save button which will save your variable changes as well as any other template changes. If there is an incorrect or incomplete section, a red error should appear and the offending section should be highlighted in red. At this stage, your document template is ready to be used or shared as a form in order to create new documents. To customize the form, check the form customization section.
Adding e-signatures to the template
Besides requiring users to feed values to the template variables, it is also possible to require an e-signature (or initials) for the document. The e-signature will be inserted in the positions defined by the template editor, immediately after the user submits the form based on this template.
This is especially useful when creating documents by sharing a form with users who need to sign the document. The document will be automatically signed when submitting the form, and will not need to be shared with those users after that.
The process of inserting a signature in a document template is similar to that of adding a variable:
- For .pdf templates: click on +New signature, below the list of variables. Select the desired element from the Signature type drop-down list (note that date stamps are explained in the next section). Then, choose the desired position for the signature in the preview and place it using your mouse cursor. To insert it in more positions, click the + button near the Variable name field;
- For .docx templates: add a variable by editing the document (as explained here), edit the variable and select Signature as the type. Then, select the desired element from the Signature type drop-down list. It is possible to insert this signature into more than one position by simply adding this same variable to the desired positions. Note that the documents created with a template that requires an e-signature (or initials) will be converted to .pdf for these elements to be placed.
The signatures required by the template will be listed under SIGNATURES, in the Template settings.
Note that, just like the template variables, each signature must have a unique name. The basic rules for naming variables also apply to signatures.
For .pdf templates, the Scale setting will be displayed when selecting an entry from the list of signatures. This can be used to define the desired size of the element.
Adding a date stamp to the template
In addition to e-signatures and initials, it is also possible to add a date element to the template, which will insert a date and time stamp with the moment that the document was created.
To do this, follow the instructions above on how to add an e-signature. From the Signature type drop-down list, select the Date option.
Allowing users to attach files
It is possible to allow users to attach files when using the template or filling a form to create a document. Currently, this feature supports the .pdf and .png filetypes.
Just like the template variables, each attachment must have a unique name, so a value (in this case, a file) can be associated with it. The basic rules for naming variables also apply to attachments.
A list of the required attachments in your template will be displayed in the Attachments section, to the right.
To add an attachment field to the form, click on +New attachment and then on the pencil button to edit it.
In the Variable field, enter a unique name for this attachment.
In the Label field, enter the text that will be shown next to the attachment when creating a document or when using a form based on this document template. When no label is informed, the Variable name will be displayed in its place.
Toggle the Mandatory switch in order to make this attachment a required field.
The Order field defines the order of the attachments that will be merged with your document. For example, if you want this attachment to be placed immediately after the document and before the remaining attachments, fill this field with the number 1.
Toggle the Store attachment to database switch if you want to save the attached file to your DocQ.
The Hint field will display a hint under the form field. Leave it empty to disable it.
Note that documents created with a .docx template will be converted to .pdf when adding attachments in order for DocQ to merge the document with the attachments.
Downloading a document template

To download a document template from DocQ, find it in the template list and click on the pencil button to open it. A preview will be displayed.
In the “Template settings” section, under “Template file”, you will see the name of the template file and a download button near it. Click on the button to download the template.
Sharing a form based on the document template
Sharing a form allows users to fill its fields with the values that will be associated with the template variables to create a new document.
This way, a template must have at least one variable for its form to be shareable.

To share a form, the corresponding template must have at least one sharing link.
To create a sharing link for a template, access the Document templates option in the left menu, find the desired template and click on the pencil icon to edit it. A preview will be displayed.
In the Share section, click on Add share link. This will create a new frame. Click on the Create button to create the link with the specified settings, then click on + Display details to access the link.
Multiple sharing links can be created for each form, in order to allow specific settings for each link.
There are two basic ways of sharing the form:
- by copying the link under SHARE A FORM and sending it to the desired destinations, who will be able to access the form through the link; or
- by copying the code under HTML IFRAME and inserting it into your website or platform with HTML support, which will then contain the form.
Other ways of giving users access to a form include the usage of plugins in DocQ.
Sharing link settings
When making changes to any of the settings of a sharing link, make sure to click on the Update button, and then on Update template.
Basic settings
In the Name field, you can choose a name for this share link. This is an optional field.
In the Expiration date field, you can choose an expiration date for this link, or leave it empty to disable it.
The Enable link switch enables or disables the sharing link.
If a link is set as disabled, users will not be able to use it to access the form.
Enabling a preview before submitting the form
Toggling the Allow preview switch will allow users to preview the document before submitting the form.
When enabling preview for a form that requires a signature, the “Sign document in the preview page” checkbox will be displayed.
This option allows the user to insert the signature in the preview of the document, instead of previewing an already-signed document.
Allow saving form filling progress
By enabling the Allow saving form data switch, users will be able to save their form filling progress, so it can be restored at a later time to be completed and submitted.
In the Expiration time field, set the expiration time for the progress saves. Note that expired form saves are removed from the DocQ database, becoming irretrievable.
To save or load the progress for a form, users need to click on the Save/Load progress button, which will be displayed at the bottom-left of the form when enabled.
Users can save progress through the Save form tab.
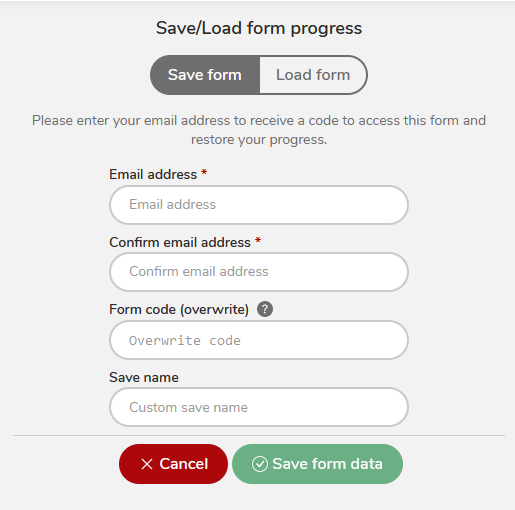
Here, an email address is required so the user can receive a unique form code to be able to reload the progress.
To overwrite a previous save, its code must be entered in the Form code field. Note that this will not send a second email with the same code.
To receive a brand new code for the save, the Form code field must be left empty.
Entering a name for the save in the Save name field will add it to the subject of the email with the form code. This makes it easier to find the desired form code in case the user receives several of them.
Users can restore progress through the Load form tab.
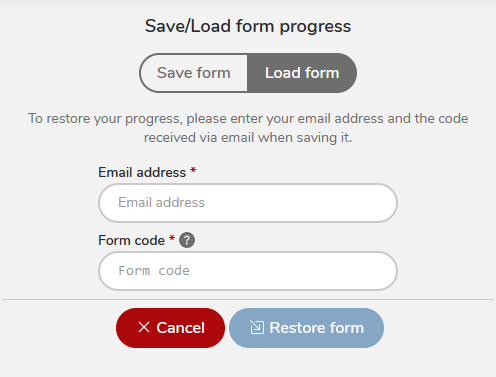
To do it, the email address used to save progress and the form code received by email must be entered in the fields.
Note that, when a user submits a form that was loaded using a form code, the save will be erased.
Sharing the link
To access the share link, click on +Display details, which will expand the section.
Under LINK FORMAT, select the desired length for the link, between Default and Short.
Under SHARE A FORM, the Open button will open the form through the link in a new browser tab.
The Copy button will copy the sharing link.
The code in the HTML IFRAME text box can be used to insert the form into a website or platform that supports HTML.
Form customization
When sharing a form without customizing it, recipients will access the default form generated by DocQ, which contains a field for each variable of the document template. Therefore, customizing a form is not a requirement for sharing it.
To customize the form, click on the Customize form button in the Share section. An edit preview will be displayed.
It is possible to add multiple pages to the form, to add sections to each page and to add elements to each section, as described further below.

There are two types of form elements - static content or template variables:
Static content elements are used to provide information to users or to improve the organization of the form.
Template variables elements are used to create a form field for the user to enter the value that will be associated to that variable in the document that will be created.
To add an element to the form, drag it from the Static content or the Template variables section onto the form, to the desired section.
Furthermore, it is possible to add rules to display specific form pages, sections or elements, as described below. These rules consist in conditions that will be tested with the values entered by the user in form fields.
After customizing the form, click on the Save button to save your changes.
Adding new pages and sections
To add a new page to the form, click on the + button at the top of the edit preview.
At the bottom of the form page, there will always be an empty section, which is used to create a new one by dragging and dropping elements from the Available resources onto it. When adding an element to an empty section, DocQ will automatically create a new, empty one at the bottom.
Note that empty sections are only displayed while customizing the form, and will not be displayed to the users it is shared with.
Static content elements
The available elements with static content are headers, paragraphs and horizontal lines.
Headers and horizontal lines can be used to improve organization and aesthetics, while paragraphs can be used to provide users with information. To be able to customize the text in a paragraph, use the Custom text element instead.
To write the content of an element, access the Field settings section, which is displayed when selecting the element in the preview.
Form fields - variable content elements
To add a field to your form, drag a variable from the Template variables list onto the form in the desired section. The value entered by the user for this field will be associated with that variable when creating a new document.
In the Field settings section, you can edit the variable settings and define the width of the element.
The width of the element is defined considering that the entire form has a width of 12 units. Therefore, selecting “3 out of 12” from the drop-down list will define the width of the element as a quarter of the width of the form. Selecting “6 out of 12” will define it as half of the width of the form, and so on.
Setting up display conditions for form pages, sections or elements

When selecting a form page, section or element, you can create conditions for it to be displayed based on the values entered by the user in form fields.
To create a condition, click on the Edit display conditions in the settings section, to the right.
Select the field whose value will be tested from the “Field” drop-down list.
Then, select an operation from the “Operation” drop-down list. The available operations depend on the type of variable that is being tested. E. g. a number variable can be tested to be higher than a certain number, and a text variable can be tested to contain keywords.
In the Value field, define the value(s) that will be used as the parameter for the test. When using the Contains keywords operation to test text or text area variables, use a , (comma) to separate the keywords.
In the example below, the value of the “description” text area variable is being tested to contain the keywords “good”, “great” or “excellent”.
You can add new rules by using the +New rule button. When creating multiple rules, use the drop-down list to define if all conditions must be met or if at least one condition must be met in order to display the section or element.
After adding and setting up the conditions, click on Save.
Form settings
To display the form settings, click the gear buttons at the top of the edit preview.
Here you can define the structure for the names of the documents that will be created using this template, the logo that will be displayed at the top of the form, the style of the form header and the pop-up message that is displayed when submitting the form.
Under “document name”, insert or remove the desired elements that will compose the name of the documents created with this template. To insert a new element, click on the + button and choose an option:
- Text: click on the added element to type the desired text;
- Variable: inserts the value associated to a variable. Note that the supported variable types are Text, Number, Date and Dropdown;
- Date: inserts the date when the form was submitted;
- Time: inserts the time when the form was submitted;
- Custom date: inserts the date when the form was submitted, with customizable format. To format it, click on the added element and type the desired format. Examples for the required notation can be found by clicking on the green clock button, shown in the custom date element.
Under “Form logo image”, you can upload the logo that will be displayed at the top of the form.
The supported filetypes are .bmp, .gif, .jpg, .png, .svg, .tiff, and .webp.
In the “Header CSS” field, you can define CSS properties to style the form header.
For more information on CSS styling, skip to this section.
The “Form completed” (Title and Text) fields can be used to customize the pop-up message that is displayed to the user when submitting the form.
Advanced styling using CSS
The style of form sections and elements can be customized by defining its CSS properties. This can be done in the Custom CSS text area in the Field settings. To learn more about styling text with CSS, visit this website.
In general, CSS styling is done by simply writing the CSS attribute in the text area and defining a value for it.
For example, to set the background color as red and to align the text to the center, place the code in the text area:
background: #FF0000;
text-align: center;
Some styling options may require you to set specific attributes.
For example, the direction and alignment of the elements in a section must be defined using Flexbox. By default, they are aligned to the top of the section. To align them to the bottom of the section, place the code in the text area:
display: flex;
flex-direction: row;
align-items: flex-end;
To learn more about styling with Flexbox, visit this website.
Deleting a Template
“Anything that is created can be destroyed.”- isn’t that true?! Now, let’s learn how to delete a template. Deletion of a template in DocQ is a very simple action that can be done real quick(within seconds). But, sometimes it can be a tricky one as well.
You can delete any template by following these steps:
- Navigate to the Templates section.
- Select Document Templates.
- Then, search for the template that you want to delete using the search option on the top right of the page or the navigation buttons at the bottom center of the page.
- Hover over the template, move the cursor to the extreme right of the template, and click on the three dots button that you see. Select Delete template from the drop-down menu.
- Next, a pop-up message appears with the Cancel and Ok buttons. Click on the Ok button to delete the selected template or the Cancel button if you want to re-think the deletion.
- Once you hit on Ok button, it deletes the template with a success message that reads- You deleted “#TemplateName”.
Your document template gets deleted following the above-mentioned.![]()
*** Note: Once deleted, the template can’t be restored. If the deletion was accidental or someone did that mistakenly, you can try your chances with our developers(restoration of a deleted template is subject to a complex time-bound process with less probability of success). If in such a situation please contact the DocQ support team.
Unable to delete a Template?
Sometimes, while deleting a template you see an error message that reads- The template is being used by SR plugin step/ The template is used by some other workflow. etc.
So, let’s learn when you can’t delete a template or why it can’t be deleted?!
A template can’t be deleted if-
- It is being used by some other Workflow(s).
- It is being used as an SR mapping template within a Plugin step in a workflow.
- It is being used as a Form Attachment step in a workflow.
- It is used by a Form Share step within a workflow.
In such a scenario, you need to clear/remove the desired template name to be deleted from all of the above-mentioned items(whichever is applicable) to delete a template.


