
Table of Contents
Workflows
A workflow is a series of steps that a document is submitted to in DocQ, reflecting its life cycle. Steps consist of several processes to which the document can be submitted, such as requiring the review or signature of specific users or departments, sharing the document (or a part of it) with the specified destinations, sending notifications or even submitting the document to another workflow.
The document will automatically move between steps after the required actions of the current step are taken. When an action is required from a user, the document can be either approved or rejected, which will define the next step for the document, based on the workflow setup.
The order of the steps can be defined by editing the workflow.
This order is not strictly sequential, as conditions can be added for the document to move to different steps depending on the results. These conditions are based on the values entered for the variables of the document template used to create the document.
Creating a workflow
To create a workflow, access the Workflows option in the left menu. A list of the workflows in your DocQ environment will be displayed. Click the +Add workflow button and start by choosing a name for your workflow, under the Settings section, to the right.
Navigation in the canvas

The canvas displays an overview of your workflow, where each step is represented by a circle, and the relations between them are represented by arrows.
- To move around, left click and drag;
- To zoom in and out, use your mouse scroll;
- To re-center the view, click on the
Centerbutton at the top; - The layout buttons at the top allow you select the preferred layout to display the steps;
- To move a step in the canvas, click on it and drag it to the desired position.
Adding and setting up workflow steps
By default, all workflows will have a Start and an End step. These define the start and the end points of the workflow and cannot be removed.
To add a new step, right-click or hold your left mouse button in the canvas, then click on the step to start editing it. Alternatively, drag a workflow step from the steps list on the left onto the canvas.
Common settings of workflow steps
A few step settings are available for all step types. These include the possibilities of:
- Entering a custom name to the step;
- Notifying the selected DocQ users when a document reaches or leaves the step.
Other step settings are available for several (but not all) step types. These include the possibilities of:
- Requiring the destinations to e-sign the document, besides reviewing it;
- Using the values entered for the variables of the document template used to create the document to compose the subject or the body of an email message, for step types that will send one;
- Using the values entered for the variables of the document template used to create the document to specify the name or email address of external users (users who do not have an account in your DocQ domain), when they are selected as destinations for a step. Note that this makes it possible to specify different external users for the documents that go through the same workflow, since the values of those variables can vary from one document to another.
Naming a step
Use the “Step name” field in the Edit step section to enter a custom name.
Naming steps is optional and may be useful to improve the readability of your workflow, both in the canvas and in drop-down lists that require you to select one of the steps.
Notifying users when entering or leaving a step
It is possible to notify users of your DocQ environment when a document reaches or leaves a step. This can be done in the Edit step section, to the right.
Requiring an e-signature besides reviewing the document

Several step types will require the selected destinations to review the document, which consists in taking an action - approve or reject.
In addition to the review, it is also possible to require an e-signature.
If the step type requires an action from several destinations, it is possible to define which ones will also need to sign the document.
To require a signature from a destination, check the Require signature on approval box after selecting a destination for your workflow step.
Using the values of variables to compose the subject and body of an email message

Certain step types allow you to send a customizable email message to the specified destinations.
When editing a step to compose the email message, it is possible to insert the values entered for the variables of the document template used to create the document into the subject or the body.
To do it, select the document template used to create the document from the drop-down list in the Workflow Properties section. The Available variables will then be displayed in the Edit step section. Place your cursor in the desired position of the message and click on the name of the desired variable, or type its name between braces.
Note that editing the document template and changing the names of these variables will also require updating these names in the message.
To format the text in the body of the email, click on the Custom Text tab. A toolbar will be displayed, which can be used to format text and to add elements such as links, headings, lists and quotes.
Using the values of variables to define the name and email address of an external user

Certain step types allow you to require an action, send a notification or share the document with external users. External users are users who are not registered in your DocQ domain. This way, they need to be identified by specifying a name and an email address.
When editing a step to specify the name and email address of an external user, it is possible to use the values entered for the available variables.
To do it, select the document template used to create the document from the drop-down list in the Workflow Properties section. In the Edit step section, toggle the Use values from variables switch for the available variables to be displayed. To select one for each field - “Variable for name” and “Variable for email” -, click on it or type its name.
Note that editing the document template and changing the names of these variables will also require updating these names in the message
Step types
The step type can be selected from the drop-down list in the Edit step frame on the right. Alternatively, simply drag the step from the left toolbox onto the canvas to create a new step.
After editing the step settings, you will need to setup the required configuration of the step and hit the save button on the upper-right part of the canvas to preserve changes.
| Step Types | Description |
|---|---|
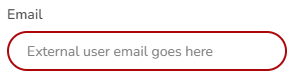
| Person step | A Person step requires the approval or signature of a specific person, which can be a user from your DocQ environment or an external user via email. To select a user from your DocQ environment, select the DocQ user tab in the Edit step section, select the user from the drop-down list.To define an external user as the recipient, select the External user tab. The Name and Email fields can be filled either manually or with the values entered for variables of the document, as explained in the common step settings.It is possible to set an expiration time, after which the document will be automatically rejected if no action was taken. This can be entered in the auto-reject field or disabled by leaving it empty. Besides the approval of the document, a signature can be required by checking the Requires signature checkbox or by clicking the signature icon near the edit step button. |
| Department step | A Department step requires any user associated to that department to review the document. Besides the approval of the document, a signature can be required by checking the Requires signature checkbox. It also allows the requirement of more than one user (in the department) needing to sign/approve the document. |
| Role step | A Role step requires a user associated to that role to review the document. Besides the approval of the document, a signature can be required by checking the Requires signature checkbox. |
| Workflow step | A Workflow step will submit the document to another workflow. After completing the second workflow, the document will then return to the original one and proceed to the next step. This is particularly useful when there is a common setup of identical steps for more than one of your workflows, helping you to avoid redundancy and to save time when creating or maintaining workflows. |
| DocuSign step | A DocuSign step requires the users selected in the previous step to sign the document in DocuSign. |
| Split step | A Split step will create one (or more) new document using the predefined ranges of pages of the original document and submit the resulting document to the selected workflow. The original document will immediately move to the next step of the original workflow. To create more than one document, click on +New split. To edit the settings of each split, click the pencil button near it.When defining the name of the document created by the split, it is possible to use values that were entered for the variables of the document template used to create the original document. To do this, click in the Document name field, then click on the desired variable, listed under the Available variables section, to insert it. |
| Group step | A Group step requires action (approval, rejection or signature) from one of the specified targets only (while a Parallel step requires action from all targets). Recipients can be added in the forms of a person - which can be a DocQ user or an external user (specified by an email address) -, a department or a role. Note that selecting a department as a recipient requires an action from any of the users associated with that department for it to count as an action in the group step, so the document will move to the next step (or return to the previous one, in case it gets rejected). The same goes for a role as recipient - it requires an action from any of the users associated with that role. For example, a group step that has a person and a department as targets will only be completed when either the person or a user that belongs to that department take action on the document. |
| Parallel step | A Parallel step requires action (approval, rejection or signature) from all of the specified targets (while a Group step requires action from only one target). Recipients can be added in the forms of a person - which can be a DocQ user or an external user (specified by an email address) -, a department, a role or a group. Note that selecting a department as a recipient requires an action from any of the users associated with that department for it to count as an action in the parallel step. The same goes for a role as recipient - it requires an action from any of the users associated with that role. A group recipient works the same way as a Group step - only one of the targets of the group needs to take an action in the document for it to count as an action in the parallel step.  The pre-approval option allows documents that were previously rejected in this parallel step to be automatically approved (and signed, if applicable) by the destinations that had already approved it when it eventually returns to this step, regardless of any modifications or version changes. The pre-approval option allows documents that were previously rejected in this parallel step to be automatically approved (and signed, if applicable) by the destinations that had already approved it when it eventually returns to this step, regardless of any modifications or version changes.This feature must be set individually for each destination, by toggling the Check icons in the step configuration frame, below the canvas and to the left. Enabling or disabling pre-approval can also be done by selecting an option in the Edit step section, to the right.You can also define if, after being rejected by a target, the document will immediately return to the previous step of the workflow or if it will wait for the remaining targets to take an action. This setting can be found in the Edit step section. |
| Form View step | A Form Share step allows the specified targets to access a form, on read-only mode, filled with the values of the metadata of the document. The form corresponds to the one based on the document template selected in the drop-down list in the Workflow Settings section.The target can be of the same types of a Person step, which are DocQ users or external users (specified by an email address). When selecting an external user, the Name and Email fields can be filled either manually or with the values entered for the variables of the document, as explained in the common step settings. The email message can be customized using the Subject and Body fields, as explained in the common step settings. Access to the form can be limited by setting an expiration time. This can be set in the Edit step section, or leave it empty to disable it. |
| Form Attachment step | A Form Attachment step gives access to a form to the specified targets via email. A new document is created when the form gets filled and submitted, which can be attached to the main document of the workflow or replace it entirely. The target can be of the same types of a Person step, which are DocQ users or external users (specified by an email address). When selecting an external user, the Name and Email fields can be filled either manually or with the values entered for the variables of the document, as explained in the common step settings. In the Edit step section, select the document template on which the form will be based from the drop-down list.The email message can be customized using the Subject and Body fields, as explained in the common step settings. To attach the main document of the workflow to the email message, check the Attach document checkbox.The option selected for Merge metadata defines what happens to the metadata of the resulting document:- Keep only new values: this will discard the metadata of the original document and keep the values entered in the form only; - Keep only original values: this will keep the metadata of the original document as it is; - Merge values, giving priority to new values: this will add the values entered in the form to the metadata of the resulting document. If the original document and the form have a variable with the same name, the value associated to it will be the one entered in the form; - Merge values, giving priority to original values: same as the above, but the value associated to the variable will remain as the one of the original document. The option selected for Attach position defines if the new document, created with the form, will be attached to the start or to the end of the main document, or if it will replace it entirely.Note that, when selecting an option to attach, both documents will be merged, which results in a .pdf document, regardless of the filetypes of the merged documents. |
| Notification step | A Notification step is an advanced way to notify people that a document has reached a certain point in the workflow. Unlike the basic enter-or-leave-step notification, it allows defining its targets based on the particular content of the document, customizing the content notification email and attaching the current version of the document to it. Targets can be of the same types of a Person step, which are DocQ users or external users (specified by an email address). When selecting an external user, the Name and Email fields can be filled either manually or with the values entered for the variables of the document, as explained in the common step settings. The email message can be customized using the Subject and Body fields, as explained in the common step settings. To attach the current version of the document to the email message, check the Attach the document to the notification email in the Edit step section.DocQ keeps a history of the emails sent through Notification steps. Access the Email review option in the left menu. A list of the notifications sent by your DocQ will be displayed. Use the filter at the top-right of the list to find the desired records. |
| Web-Service Step | A Web-Service Step makes standard or custom HTTP method calls from within DocQ. Input the URL to call and customize the header, parameter and body. DocQ fields from the associated Document Template can be used in the calls. |
| Edit Document Property Step | A Document Property Step allows the workflow to modify some core document properties like converting it to PDF, renaming it, managing its tags or groups and even move it to the specified Folder. |
| Edit Document Content Step | A Document Content Step allows the workflow to replace clauses within the document and perform calculations and other operations to define values of variables. |
| Timer Step | A Timer Step allows the delay of the workflow for an amount of time before moving on to following steps. This delay can be static time input by the user or even dynamic based on variables or schedules. |
| Plugin Step | A plugin Step allows the integration of the workflow with third party providers. |
| Action Step | An action step is a way of dynamically specifying a person, department or role as the recipient based on variables. While a person, department or role step will define the destination in a static way, the action step will use variables to do this dynamically. |
Defining the order and relations between steps
A document will automatically move to another step after the required actions of the current step are taken.
A workflow cannot be created or updated if there are no possible paths for the document to reach the End step starting from the Start step.
Selecting the default steps for the document to move to
It is mandatory for each step to refer to another as the default next step for the document to move to. In the canvas, steps that have no next step selected will be highlighted with a red border. If this is the case, you will not be able to create or save the changes for the workflow.
Step types that require users to take an action can result in approval or rejection, and a default next step must be selected for each outcome.
Step types that do not require actions from users only need to refer to one step as the default next step.
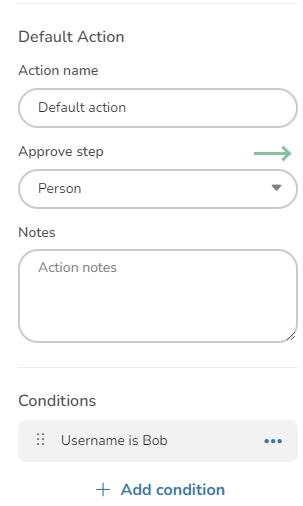
To select the next step, enter the Edit Step window to the right of the workflow canvas. Scroll to the Default Action section and use the Approve step drop-down to select the next step in the workflow. Don't forget to do the same for the Reject step and hit save when all workflow steps are connected and settings are configured.
Adding conditions to move the document to alternative paths
Besides selecting a default next step, it is also possible to test conditions that, when met, will move the document to a step other than the default one. This is done through the use of IFTTT (If This Then That), by adding conditions to steps.
The tests are made with the values entered for the variables of the document template used to create the document. This way, a document template needs to be specified for the workflow so the available variables can be listed when creating a condition. Specify a template by selecting it from the Document template drop-down list in the Workflow Properties section, to the right. Alternatively, tests can also be made on document properties (such as filesize, extension, etc.) or DocQ properties
(DocQ name or group membership).
To add a conditional test, click on +Add condition in the Conditions section, below Default Action section in the Edit step window.
Setting up conditions
Once a condition is added from the above step, click the condition about the +Add condition button to edit settings.
Select the variable whose value will be tested from the “Field” drop-down list. If the condition is contingent on a document property change the Type dropdown to the “Property” value.
The available operations for testing will be displayed based on the type of the selected variable - e. g. number variables can be tested to be higher or lower than a certain value; text or email variables can be tested to contain keywords. Select the operation and enter the value that will serve as the parameter for the test in the “Value” field. When using the “Contains keywords” operation to test text or text area variables, use a , (comma) to separate the keywords.
Next, select a next step for this condition from the “Approve step” drop-down list or use the target button near it to select a step by clicking on it in the canvas. A blue arrow will be displayed linking both steps.
If applicable, repeat the process with the “Reject step” drop-down list to select a next step for this condition in case the document gets rejected.
Optionally, you can give a name to this test in the “Action name” field.
Note that it is mandatory to select a next step for at least one of the outcomes (approval or rejection), but it is not mandatory to select a next step for both of them. If a next step for one of the outcomes is not selected, the document will follow the default next step.
To add more conditions, click on +Add condition and repeat the process.
Note that, regardless if the conditions added to a step cover all possible values for the variable, a default step must still be specified.
Conditions can be combined through the use of Condition Groups. Each condition group will need all it conditions met to satisfy that group, but if any of the groups are satisfied the step will proceed with the approval path for those conditions. If none of the condition groups have all their conditions met, the step will proceed with the rejection path for this set of conditions.
Workflow Settings
When creating or editing a workflow, you can edit its properties in the Workflow Settings section - which can be opened on the right under Settings.
To set this workflow as the default workflow for your DocQ environment, toggle the Default Workflow switch.
If you have your FTP server registered in DocQ, you can configure your workflow to send a copy of documents that have completed the workflow by toggling the Send to FTP on complete switch.
Enabling the Allow email copy on complete switch will give users the option of receiving a copy of the document by email when it reaches the end of the workflow. This option is presented to users when taking action on the document.
The Content access drop-down list allows you to restrict the access to this workflow to the selected content access permission group.
For the Document template drop-down list, select the document template used to create the documents that will be submitted to this workflow. This will provide the list of available variables whose values can be used in several step types or to test the IFTTT conditions, which will define the path that the document will follow through the workflow.
For more information on how to define the available paths for the documents through the workflow, visit the steps order section.
This option also defines the template that will be used to generate a preview to build a signature template for this workflow.
Setting up a signature template for the workflow
A signature template allows you to predefine the positions for the signatures that will be placed in documents submitted to this workflow.
The Signature template button will be displayed above the upper right of the canvas for workflows that require at least one signature.
To learn how to set up a signature template for a workflow, visit this page.
Troubleshooting
There are a few requirements that must be fulfilled for a workflow to be created or for changes on it to be saved:
- There must be no incomplete steps, with missing configurations;
- Steps must have their actions assigned to another step in the workflow.
- All steps must be reachable from the Start step.
Invalid steps
Invalid steps are highlighted with a red border in the canvas.
The reasons why a step can be marked as invalid by DocQ are:
- No next step was selected for the step;
- There is required information missing for that specific step type.
Steps without a next step to move to
All steps (except for the End step) require a default next step for the document to move to. Step types that require an action from users also require a default step in case the document gets rejected by a user.
When adding conditional tests to move the document to steps other than the default one, a next step must be selected for at least one of the outcomes (approval or rejection).
For more information on how to define the order of the steps and how to create alternative paths for the documents, check the steps order section.
Steps with missing required information
Each step type requires specific information. Missing information will be highlighted in the step settings on the right by red bordering.
For example, a Department step requires the user to select a department for the document to be shared with.
For more information on step types, check the step types section.
Steps that cannot be reached from the Start step
The steps of a workflow must be linked in a way that all of them are reachable from the Start step. Several paths can be created to reflect different scenarios.
For more information on how to define the order of the steps and how to create alternative paths for the documents, check the steps order section.
Deleting a Workflow
A workflow can only be deleted if there are no document templates, active documents or other workflows using that workflow. In order to delete a workflow the user can interact with the side menu (three dots) on the right side of the respective workflow in the workflow list and click “Delete workflow”. Alternatively, it is possible to use navigate to the desired workflow (open it), and use the “Delete” button at the bottom right of the settings menu.
Page Tools
