Table of Contents
Documents
Documents are the most fundamental unit in DocQ. Every action that is taken happens over a document.
Creating a document
There are several ways to create documents in DocQ.
The main ones are by File Upload, by using a Document Template and by filling a Form based on a document template.
Other ways to create a document include using FTP, fetching attachments from monitored email inboxes and using the available integrations for DocQ.
Uploading a document to DocQ
To upload a document to DocQ, access the Documents option in the left menu. A list of the documents in your DocQ environment will be displayed. Click the +Add Document(s) button and select Upload file(s).
Click on Upload from computer or drag and drop the file that you want to upload. Currently, the filetypes supported by DocQ are: portable document format (.pdf), Microsoft Office files (.docx and .pptx), and image files (.png).
The basic settings for a document will then be displayed.
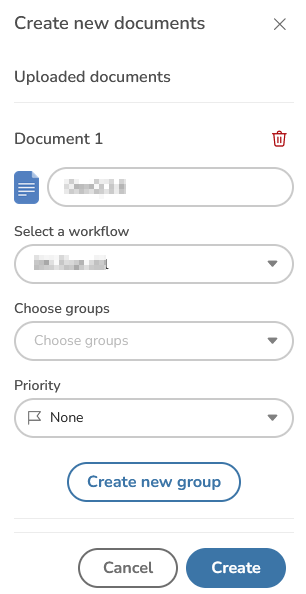
In the Workflow drop-down list, choose the Workflow to which the document will be submitted.
In the Groups drop-down list, you can optionally choose the groups of documents to which the document will be associated.
New groups can be created by clicking on the Create new group button. For advanced management, access the Groups option in the left menu.
After setting up your new document, click on Create documents.
Uploading a bulk of documents to DocQ
It is possible to upload more than one document at a time by selecting multiple documents in the upload dialogue or by dragging and dropping multiple documents.
The basic settings for each document will be displayed as a list, so you can choose a name, a workflow and the groups for each document.
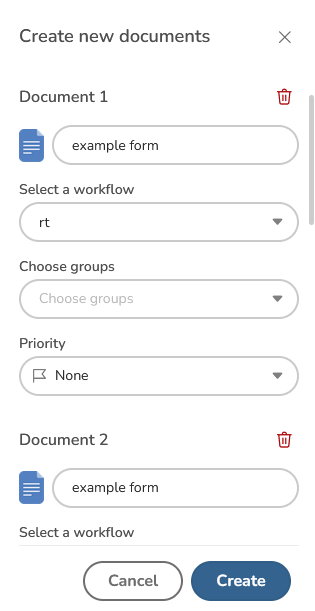
After setting up all the documents, click on Create documents.
Using a document template or a form to create a document
Document templates can be used to avoid having to repeatedly write common content every time similar documents are created.
They can be used to create documents identical to each other or, when adding variables to the template, documents with different values for them.
Creating a document using a document template without variables
To create a document using a template that has no variables, access the Documents option in the left menu. A list of the documents in your DocQ environment will be displayed. Click the +Add Document(s) button and select From template.
Select the template from the drop-down list and click on Create.
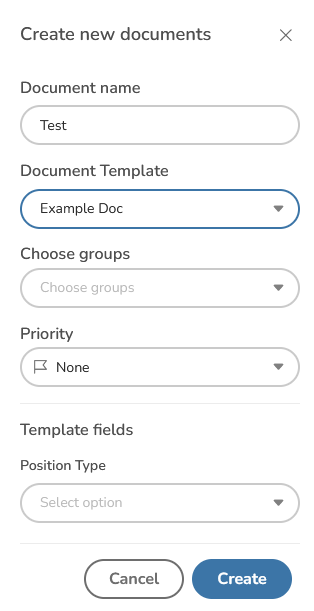
Note that .pdf document templates will create identical documents, since it is not possible to edit the content of a .pdf file in DocQ.
On the other hand, when uploading a .docx template, it can be edited using the embedded editor in DocQ to create different documents.
Creating a document using a document template with variables
There are two ways of creating a document using a template with variables.
The first way is within DocQ, available for users in your DocQ environment that have this permission.
Access the Documents option in the left menu. A list of the documents in your DocQ environment will be displayed. Click the +Add Document(s) button and select From template.
Select the template from the drop-down list. A form will be displayed so you can fill the fields with the values that will be associated with the template variables.
After filling the form, click on Create.
The second way is to share a form with the person who must inform the values for the variables. The form can be filled out by anyone who has access to a link for it.
Advanced ways to create documents
Documents can also be brought to DocQ via File Transfer Protocol (FTP, sFTP or FTPS), or even via the automated monitoring of email inboxes, by fetching files from attachments.
To learn more about these options, please contact our support (support@docq.app).
Another way to create a document is by using the available integrations for DocQ.
Editing documents
To edit a document or to change its properties, access the Documents option in the left menu. A list of the documents in your DocQ environment will be displayed.
At the top right, you can adjust the filter for the list to only show the desired documents.
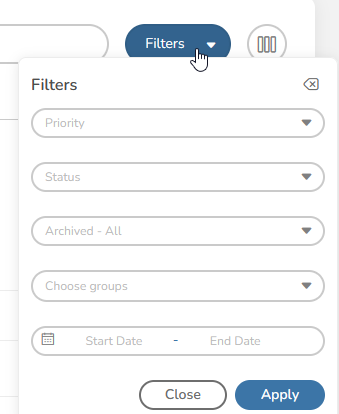
Also at the top right, you can use the List settings button, right beside the Filters, to show or hide the desired attributes, such as document ID, priority flag, name, among others.
Editing the content of a document
Documents can be edited using the document editor embedded in DocQ. Note that:
- It is only possible to edit the content of .docx documents, and not of .pdf documents;
- DocQ converts .docx documents to .pdf when they go through some processes or when they receive a signature, making the document no longer editable;
- It is only possible to edit or delete active documents - the ones that do not have the “Completed” status yet, which is achieved by reaching the end of the workflow they were submitted to.
To edit the content of a document, find it in the document list and click on its name to open it. A preview of the document will be displayed.
Click the Edit button at the top of the preview to open the document editor.
After making changes to the document, click on the Save button, then on the View button at the top to return to the preview mode. It may take a few seconds for the preview to be updated.
Renaming a document
To rename a document, find it in the document list and click on its name to open it. A preview of the document will be displayed.
Enter a new name in the Document name field and click on the Update name button.
Note that documents with the status of “Completed” (achieved by reaching the end of the workflow they were submitted) cannot be renamed.
Uploading a new version of a document
To upload a new version of a document, click on Upload file under “Upload new file”.
Note that this is only available for active documents and will discard the signatures inserted in the current version of the document.
Uploading a new version of a document that has pending signatures
It is possible for a document to have pending signatures - signatures that were received but not inserted in the document yet.
When a document goes through a parallel step in a workflow, the signatures received from the recipients will only be inserted when the document leaves the step, which, by default, happens when all recipients take an action, completing the step.
Some of these recipients may be marked with the pre-approval feature - this means that, if the document is rejected during the parallel step, they will not need to re-approve it when it returns to this step. The feature also includes signatures - in this case, recipients will not need to sign a rejected document again.
Therefore, when a document is signed by a recipient marked with the pre-approval feature and then gets rejected by another user, it will have a pending signature, that will only be inserted after the document returns to the parallel step and receives the required actions from the remaining users, completing the step.
When uploading a new version of a document that has pending signatures, it is possible that these signatures will be placed in undesired or invalid positions, considering that the content or even the dimensions of the new version may differ from the original document.
A pop-up window will be displayed for you to choose between ignoring this risk and keeping the pending signatures, or discarding and requesting them again from the users marked with pre-approval.
Updating the metadata of a document
DocQ uses two types of metadata. Form metadata is associated to the variables of the document template used to create the document. Custom metadata are created by DocQ internal users that can be used to associate other information with the document (e.g. contact information which should not appear on the document).
Changes in the metadata are prospective. This means that, when editing the metadata, the body of the document will remain unaltered, with the original values of the variables.
The purpose of changing the metadata is to update the values of the variables that are going to be used in the next steps of the workflow that the document was submitted to.
Note that the metadata can only be updated by DocQ users who currently have it in their queues for reviewing.
Therefore, it is only possible to update the metadata of active documents - the ones that do not have the “Completed” status yet, which is achieved by reaching the end of the workflow they were submitted to.
To update the metadata of a document, the variables that you want to change must be included in the list of metadata fields of your DocQ environment, as explained below.
Adding custom metadata fields to DocQ
To add metadata fields to your DocQ environment, access the Metadata option in the left menu. A list of the metadata fields will be displayed. Click the +Add Metadata button to create a new field or find an existing one in the list and click the pencil button near it to edit it.
In the Name field, enter the name of the variable of the document template used to create the document.
Then, select the field type from the drop-down list and click on Add metadata or Edit metadata.
This metadata field should now be available when editing the metadata of a document, as explained below.
Updating the metadata
To update the metadata of a document, find it in the document list and click on its name to open it. A preview of the document will be displayed.
In the Document metadata section, the Field drop-down list will list the metadata fields that were added to your DocQ environment. Select the variable whose value will be updated and enter the new value in the field.
Proceed to select the desired variables and their new values, then click on Update metadata to save your changes.
Scheduling reminders for specific users to review the document
Under Document reminders, you can schedule reminders that will be sent to the selected destinations via email, in the selected date, to remind them to take an action on the document.
Destinations can be DocQ users or external users (specified by an email address).
The message sent with the email can be customized through the text-area field, and a copy of the document can be sent by checking the Attach the document to the reminder option.
Changing the workflow to which the document is submitted to
To change the workflow to which the document is submitted to, find it in the document list and click on its name to open it. A preview of the document will be displayed.
In the Document Workflow section, select another workflow from the drop-down list and click on Update workflow.
Note that this is only possible for active documents - the ones that do not have the “Completed” status yet, which is achieved by reaching the end of the workflow they were submitted to.
Moving the document to another step in the workflow
To move the document to another step of its current workflow, specify the reason for doing so in the text area and then click on the Move to another step button, select the new step from the drop-down list and click on the move button.
Note that this is also only possible for active documents.
Splitting a document
Splitting a document will create one or more documents made from the selected pages of the original document in the split setup. The resulting documents will then be submitted to the workflows selected for each.
There are two ways of splitting a document in DocQ:
- Manually, using the split feature in the Documents section, as described below;
- Automatically, using a Split step in a workflow.
To manually split a document, find it in the document list and click the Split button, near the pencil button.
Note that this is not available for .docx documents, but for .pdf only - which includes documents that were created as .pdf and documents that were created as .docx but were converted to .pdf by DocQ.
A preview of the original document will be displayed.
In the “Document Splitting” section, select the range of pages of the resulting document, choose a name for it and select a workflow from the drop-down list. To create more than one document, click on +Add split and repeat the process.
Toggle the Complete master document life cycle switch to move the original document to the end of the workflow it was submitted to, thus completing its life cycle, or leave this option disabled for its progress to remain unaltered.
Finally, click on the Confirm button to create the new documents.
Merging documents
To merge documents, click on the Merge Documents button at the top of the documents list. A preview will be displayed and updated once you include documents in the process.
There are a few requisites for a document to be available for a merging operation:
- This is only supported for .pdf documents;
- The document cannot have the status of “Completed”. This status is achieved when reaching the end of the workflow it was submitted to.
To add a document to the merging operation, select it from the drop-drown list in the Document Merging section.
Select the desired range of pages that will be included in the resulting document.
Toggle the Complete document life cycle switch to move the selected document to the end of the workflow it was submitted to, or leave this option disabled for its progress to remain unaltered.
Add more documents to the merging operation using the drop-down list and use the ^ Move Up and ^ Move Down buttons to change their order in the resulting document.
Enter the name of the resulting document in the Document name field and select the workflow to which it will be submitted.
You can also add an optional comment in the Note field.
Finally, click on the Confirm button to proceed with the merging operation.
Deleting a document from DocQ
To delete a document from your DocQ environment, find it in the document list and select it on the left box, then hit on the Delete button.

Note that documents that have the status of “Completed” cannot be deleted. This status is achieved when reaching the end of the workflow the document was submitted to.
Trash
The “Trash” feature works as a temporary archive for documents that have been completed. It will hold deleted documents for 30 days and allows the restoration of said documents within that time.
Downloading a document from DocQ
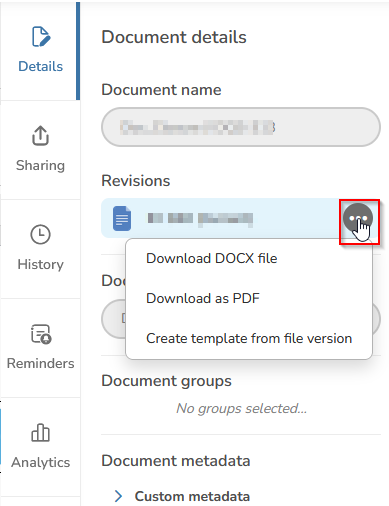
To download a document from DocQ, find it in the document list and click on its name to open it. A preview of the document will be displayed.
Just select the Details tab and hit on the 3 dots and choose the best option that fits you.
Sharing a document
The Share by email button allows you to share a document with the specified targets, with read-only access or to request signatures.
For more information on sharing documents by email, visit this page.
Document history
It is possible to inspect the history of a document in DocQ through an audit trail, which includes any actions that were taken on or with it, even if they did not result in changes in the document or in the creation of a new version of the document. Examples of actions are going through a workflow step or being shared manually.
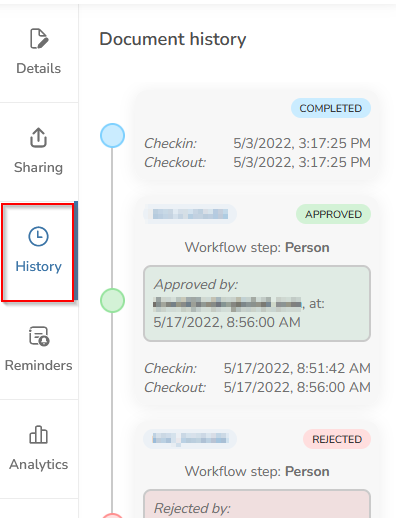
This is a sample of the history of a document.

